Хорошо, у меня есть соединитель мощносты и вентиляционныe каналы и отделка вентиляционных каналов установлены. R2 идет вдоль, но чем больше я получаю сделано, тем больше я неудовлетворенный с ним в целом. Как я уже говорил, пластик не лучшая среда, с которой работает, когда дело доходит до кожи. Это надуманный и хрупкий и трудно прикрепления деталей. Я бы предпочел использовать гайки и болты, чем силикон.
Честно говоря, после окончательного частей из R2 прилагается, я собираюсь пересмотреть все это. Плюсы использования алюминия серьезно перевешивают минусы. Я, вероятно, собирается заменить кожу, вентиляционные отверстия, порты и муфты алюминия.
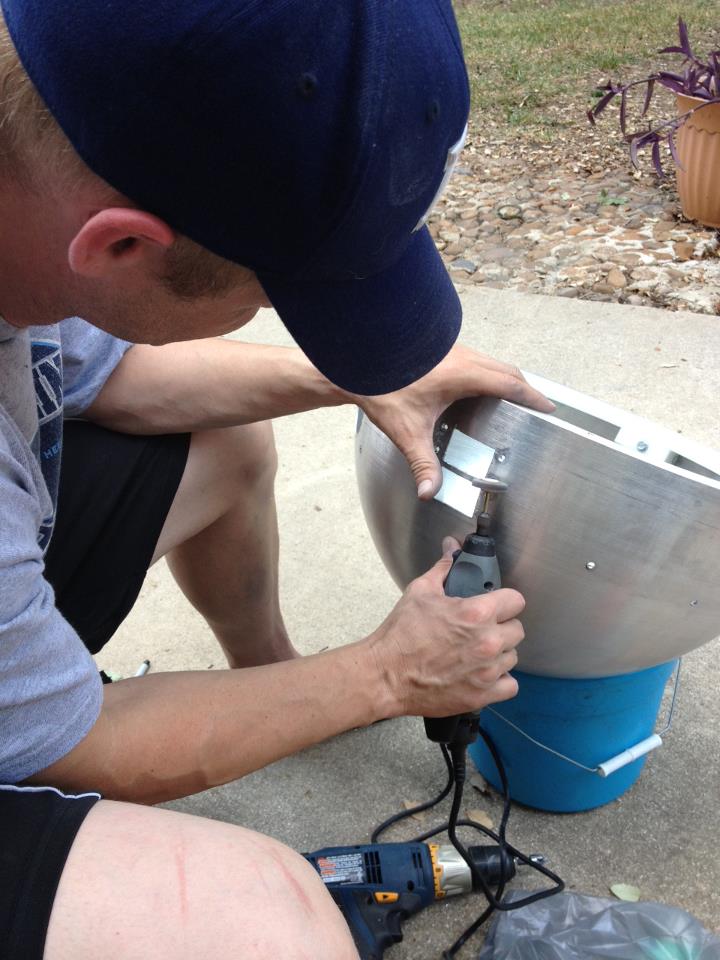
Ok, I got the power coupler and center vents installed, along with the vent trim. R2 is coming along, but the more I get accomplished, the more I am unsatisified with it as a whole. As I said earlier, plastic is not the best medium with which to work when it comes to the skins. It is flimsy and fragile and difficult to attach parts. I would much prefer to use nuts and bolts than silicone.
Honestly, once I get the final peices of R2 attached, I am going to rethink the whole thing. The pros of using aluminum seriously outweigh the cons. I am probably going to replace the skin, vents, ports and couplers with aluminum.
Monday, August 5, 2013
Monday, July 29, 2013
Back door - задняя дверь
Для того, чтобы иметь возможность доступа к внутренней R2 как только кожа была прикреплена, пришлось создать заднюю дверь. Чтобы сделать это, я должен был порезать кожу, однако, вот в чем вопрос: как я сослался ранее, кожа пластика и не имеет прочности или устойчивости алюминия версии. Так, однажды я вырезал панели, чтобы создать дверь, я должен был создать кадр, чтобы помочь поддержать дверь. Можно видеть пластиковой полоски в верхней части двери. Далее, как только он был сокращен, пластиковая панель не будет проводить изогнутую форму необходимо. Я принял металлического листа и согнуты его к форме тела и приклеить его к внутренней части панели. Дверь крепится с помощью магнитов
In order to be able to access the inside of R2 once the skin was attached, I had to create a rear door. To do this, I had to cut the skin, however, here's the issue: as I referenced earlier, the skin is plastic and does not have the durability or stability of the aluminum version. So, once I cut the panel to create the door, I had to create frame to help support the door. You can see the plastic strip at the top of the door. Next, once it was cut, the plastic panel would not hold the curved shape needed. I took a piece of sheet metal and bent it to the shape of the body and glued it to the inside of the panel. The door is attached with magnets.
Следующим шагом было его "кожа". В попытке сэкономить деньги в очень дорогой сборки, я решил купить пластиковые кожи. Хотя они легко работать, они не имеют долговечность Мне хотелось бы надеяться (более внимательно следить). Как вы можете видеть, отверстия для различных частей вырезаны лазером и легко выскочить. Кожа комплект также входит различных частях можно склеивать, чтобы сделать полный пластиковый дроида. Кожа состоит из 4 частей: передней и задней внутренней и передней и задней внешней.
The next step was the "skins" for R2. In an effort to save money in a very expensive build, I opted to buy the styrene skins. Although they are easy to work with, they do not have the durability I would have hoped (more to follow). As you can see, the openings for the different parts are laser cut and easily pop out. The skin kit also comes with different parts you can glue together to make a complete plastic droid. The skin comes in 4 pieces: front and back inner and front and back outer. On the outer pieces, the parts that give the illusion of working doors are removed and labeled so I will know where they go when I glue them back on.
На внешней части, части, которые создают иллюзию рабочей двери удаляются и маркированытак, я буду знать, куда они идут, когда я склеить их обратно.
On the outer pieces, the parts that give the illusion of working doors are removed and labeled so I will know where they go when I glue them back on.
Вот тест приступе скины для проверки allignment и посмотреть, как это будет выглядеть.
Here is a test fit of the skins to check for allignment and to see how it will look.
the frame - рама
Были определенные части я знал, что хочу в алюминиевой: голова и рамой. Я получил кадр, от производителя, на astromech.net, и быстро собрал его.
There were certain parts I knew I wanted in aluminum: the head and the frame. I recieved the frame from the vendor on astromech.net, and promptly assembled it.
Thursday, July 25, 2013
My paint recipe - Mой рецепт краски
Эти краски я использую для достижения цвет мне нравится. Я начинаю с помощью Dupli-Цвет Sonic Pearl Blue (Соник жемчужнo-голубой), то только она высохнет, я использую Rustoleum Cobalt Blue Metallic и быстро "туман" над Dupli-Color. Когда она высохнет, я использую Krylon Clear Coat, чтобы запечатать его.
This is the paint I use to achieve the color I like. I start by using the Dupli-Color Sonic Pearl Blue, then once it is dry, I use the Rustoleum Cobalt Blue Metallic and quickly "mist" over the Dupli-Color. When it is dry, I use Krylon clear coat to seal it.
Monday, July 22, 2013
Gluing the domes
Далее, мне нужно, чтобы клей 2 половинки головы вместе. Для того, чтобы сделать это, я должен обеспечить 2 половинки прямо и ровно и, что отверстия выровнены так, что все подходит. Как только все будет прямо, я приклеил 2 половинки с использованием четких силиконовый клей, то я использовал зажимы провести половины.
Next, I glued the 2 halves of the dome together. To do that, I needed to make sure that the 2 halves were level and straight and that they lined up properly. Once that was done, I used clear silicone adhesive to glue the halves together and clamps to make sure they stayed in place.
приклеивать - to glue
Installing the lights
Потом, мне надо было вырезать панели и бурить дыры для того, чтобы установить cвет. Я использовал Dremel и режущий диск, чтобы вырезать панели и сверло, чтобы просверлить дыры. Cвет удерживаeтся на месте с помощью болтов. Я должен был зенковать болты так, чтобы две половинки головы могли быть склеены.
Next, I had to cut out the panels and drill holes so that I could install the lights. I used a Dremel and cutting disc to cut the holes for the lights and a drill to drill mounting holes. The lights are held in place by bolts, so I had to countersink the bolt holes so that the bolts would sit flush and allow the two halves of the dome to be glued together.
зенковать - to countersink.
Sanding
Потому что голова была создана на токарном станке, есть "spin lines", которые необходимо удалить. Это было сделано, начиная с зернистостью 800, влажной наждачной бумагой, водой и много работы. Я постепенно пошел гладко наждачной бумагой пока «spin lines" не было.
Because the head was created on a lathe, there are "spin lines" that needed to be removed. This was done by starting with 800 grit wet sandpaper, water, and a lot of work. I progressively went to a smoother sandpaper until the "spin lines" were gone.
шлифовать - to sand or grind
Because the head was created on a lathe, there are "spin lines" that needed to be removed. This was done by starting with 800 grit wet sandpaper, water, and a lot of work. I progressively went to a smoother sandpaper until the "spin lines" were gone.
шлифовать - to sand or grind
Subscribe to:
Posts (Atom)